There's a unique satisfaction that comes from dipping a warm piece of pita into a bowl of perfectly made hummus – a dip that’s not just delicious but also incredibly healthy and versatile. While store-bought options abound, they often fall short of the true ideal: that exquisite, smooth creamy homemade hummus that captivates your palate. Imagine crafting a velvety, intensely flavorful dip right in your own kitchen, ready to elevate any snack or meal. This article is your definitive guide to achieving just that, transforming simple ingredients into a culinary masterpiece. Forget grainy textures or bland flavors; we're about to unlock the secrets to truly superior homemade hummus.
The Foundation of Flavor: Selecting Your Hummus Ingredients
The journey to creating truly smooth creamy homemade hummus begins long before you even touch a blender. It starts with a discerning eye for ingredients. Each component plays a crucial role, not only in taste but also in achieving that coveted silken texture. Compromising on quality here is like building a house on sand – the results will inevitably fall short.
Chickpeas: The Heart of Hummus
Chickpeas (also known as garbanzo beans) are the undisputed base of hummus, providing its bulk, a delicate nutty flavor, and much of its creaminess. You have two primary choices:
- Canned Chickpeas: For speed and convenience, canned chickpeas are a fantastic option. They’re pre-cooked, saving you significant time. However, always rinse them thoroughly under cold water to remove excess sodium and any residual canning liquid, which can affect flavor. Pro tip: Gently warming canned chickpeas before blending can help them break down more easily, contributing to a smoother texture.
- Dried Chickpeas: If you have the time, dried chickpeas offer an unparalleled depth of flavor and texture that many connoisseurs swear by. The key here is proper preparation. Soaking them overnight softens them significantly, reducing cooking time. The cooking process itself is critical: boil them until they are not just tender but almost falling apart – melt-in-your-mouth soft. This extended cooking time breaks down the starches, making them incredibly amenable to blending into a silky paste.
Regardless of your choice, ensuring your chickpeas are thoroughly cooked and soft is the first, non-negotiable step towards achieving a truly smooth creamy homemade hummus.
Tahini: The Soul of Smoothness
Tahini, a paste made from ground sesame seeds, is perhaps the most defining ingredient in hummus, beyond the chickpeas themselves. It contributes a rich, earthy, slightly bitter depth of flavor and, crucially, plays a pivotal role in creating the hummus's signature smooth, emulsified texture.
- Quality Matters: Seek out a high-quality tahini. Look for brands that are light in color, pourable (not thick and pasty), and made from hulled sesame seeds, which produce a less bitter flavor. A good tahini will have a single ingredient: sesame seeds.
- Preparation: Always stir your tahini well before using, as the oil often separates and rises to the top. Fresh tahini blends more easily and contributes significantly to the overall creaminess. Poor quality or old tahini can lead to a gritty texture or an overpowering, bitter taste.
When combined with lemon juice and water, good tahini helps create a stable emulsion, giving hummus its characteristic luscious body.
Freshness Factor: Lemon and Garlic
These two ingredients inject vital brightness and punch into your hummus, balancing the richness of the tahini and chickpeas.
- Lemon Juice: Freshly squeezed lemon juice is paramount. Its vibrant acidity cuts through the richness, brightens all the flavors, and helps create the creamy emulsion. Bottled lemon juice, often pasteurized, lacks the lively, fresh zest of real lemons and can introduce an off-flavor.
- Garlic: Fresh garlic cloves are non-negotiable for their pungent, aromatic kick. Avoid pre-minced garlic, which often has a muted, almost metallic flavor. The amount of garlic is a matter of personal preference; a good starting point is one or two medium cloves, which you can adjust in subsequent batches. For an even smoother garlic distribution and to mellow its raw edge slightly, consider mincing your garlic and mashing it with a pinch of salt using the side of your knife before adding it to the food processor.
The Finishing Touches: Olive Oil and Seasonings
These final ingredients tie everything together, adding richness, depth, and the perfect flavor profile.
- Extra Virgin Olive Oil: A good quality extra virgin olive oil contributes a fruity richness and enhances the overall mouthfeel. While some recipes call for adding a generous amount into the blend itself, many purists reserve it primarily for a final drizzle, allowing the tahini and water to do most of the emulsifying work for ultimate lightness.
- Salt: Essential for enhancing and balancing all the other flavors. Start with a moderate amount and adjust to taste.
- Ground Cumin: This warm, earthy spice adds a subtle, authentic Middle Eastern note without overpowering the other ingredients. A little goes a long way.
By prioritizing fresh, high-quality ingredients, you lay the strongest possible foundation for an incredibly smooth creamy homemade hummus.
Mastering the Process: Steps to Silky Smooth Hummus
With your premium ingredients ready, the next step is to master the techniques that transform them into that dreamy, smooth creamy homemade hummus you're craving. Precision and patience in these stages are key.
Preparing Your Chickpeas for Perfection
The secret to truly silky hummus often lies in the chickpeas themselves.
- Dried Chickpeas: If you're using dried, ensure they've been soaked overnight (or for at least 8 hours). Drain and rinse them well. Then, boil them in fresh water until they are not just soft but incredibly tender – so soft that they easily mash between your fingers. This can take anywhere from 1 to 2 hours, depending on the age of the chickpeas. Undercooked chickpeas are the enemy of smooth hummus. Drain and allow them to cool slightly.
- Canned Chickpeas: Drain and rinse thoroughly. As mentioned, gently warming them can aid in breaking them down.
- The Chickpea Peeling Trick (Optional but Recommended): For the absolute smoothest hummus, consider removing the skins from your chickpeas. This might sound tedious, but it makes a noticeable difference. You can do this by rubbing cooked chickpeas vigorously between your hands in a bowl of water, allowing the skins to float to the top for easy skimming. Alternatively, for a smaller batch, simply pinch each chickpea between your fingers. While time-consuming, this step removes the fibrous outer layer that can contribute to a slightly grainy texture.
The Art of Blending: Unlocking Creaminess
Your food processor is your best friend here. A high-powered machine will yield the best results.
- Initial Blend: Place your prepared (and possibly peeled) chickpeas into the bowl of your food processor. Add the tahini, fresh lemon juice, garlic, and salt.
- Emulsification Phase: Begin blending on high speed. As it starts to come together, you'll notice a thick, pasty mixture. Now, with the processor running, slowly drizzle in 2-3 tablespoons of very cold water (or even an ice cube or two). The cold water helps the tahini and lemon juice emulsify, creating a lighter, fluffier texture. Continue blending for several minutes, scraping down the sides of the bowl frequently to ensure all ingredients are incorporated evenly. Don't be shy with the blending time; often, people stop too early.
- Achieving Ultimate Smoothness: Keep blending! You want the mixture to transform from chunky to a truly uniform, creamy paste. This might take 5-7 minutes of continuous blending, depending on your machine. The heat generated by blending also helps further break down the chickpeas. The longer you blend, the smoother your hummus will become.
Achieving Ideal Consistency and Flavor Balance
This is where you fine-tune your smooth creamy homemade hummus to perfection.
- Adjusting Consistency: Once the hummus is wonderfully smooth, assess its thickness. If it's too thick, add more cold water, one tablespoon at a time, blending well after each addition until you reach your desired creamy consistency. Avoid adding too much olive oil at this stage, as it can make the hummus heavy; water is better for achieving a light, airy texture.
- Balancing Flavors: Taste your hummus. Does it need more salt to bring out the flavors? Does it need more lemon juice for brightness and tang? Perhaps a touch more cumin for warmth? Adjust these seasonings to your preference, blending briefly after each addition to fully incorporate them.
Remember, the goal is a harmonious balance where no single flavor dominates, and the texture is uniformly luscious. This iterative process of blending and tasting is what makes homemade hummus truly personal and exceptional.
Troubleshooting & Tips for Your Best Batch of Smooth Creamy Homemade Hummus
Even with the best intentions, sometimes challenges arise. Here’s how to troubleshoot common issues and incorporate advanced tips for consistently perfect results.
Common Hummus Hurdles and How to Overcome Them
- Grainy Texture: This is the most common complaint.
- Cause: Undercooked chickpeas, skins not removed, or insufficient blending time.
- Solution: Ensure chickpeas are *very* soft. If using dried, cook longer. Consider peeling chickpeas. Blend for at least 5-7 minutes, scraping the sides often, and don't hesitate to add a little extra cold water to aid the process.
- Bitter Taste:
- Cause: Low-quality tahini (especially if made from unhulled sesame seeds), too much tahini, or too much raw garlic.
- Solution: Use a good quality, light-colored tahini. Balance with extra lemon juice or a pinch of sugar. If garlic is too strong, roast it before adding for a milder, sweeter flavor.
- Too Thick or Too Thin:
- Cause: Incorrect liquid ratios.
- Solution: Too thick? Add cold water or a splash more lemon juice, one tablespoon at a time, blending between additions. Too thin? This is harder to fix. You can try adding a few more cooked chickpeas or a bit more tahini, blending well.
Pro Tips for Ultimate Smoothness
- Embrace the Heat: When blending, the friction from the food processor blades will generate heat. This is beneficial! It helps break down the chickpea proteins even further, contributing to an unbelievably smooth consistency. So, don't be afraid to let your machine work for a solid 5-7 minutes.
- The Ice Water Trick: Adding very cold water or even a few ice cubes during blending isn't just for consistency. The cold temperature also helps to 'fluff up' the hummus, making it lighter and creamier by assisting in the emulsification process.
- Pre-Blend Tahini & Lemon: Some chefs recommend blending the tahini and lemon juice with a touch of cold water first, until it becomes pale and fluffy, before adding the chickpeas. This creates a stable base emulsion that then smoothly incorporates the chickpeas.
- Rest for Flavor Development: While delicious immediately, allowing your smooth creamy homemade hummus to rest in the refrigerator for at least an hour (or even overnight) allows the flavors to meld and deepen beautifully.
Serving Suggestions and Storage
Once perfected, your homemade hummus is incredibly versatile.
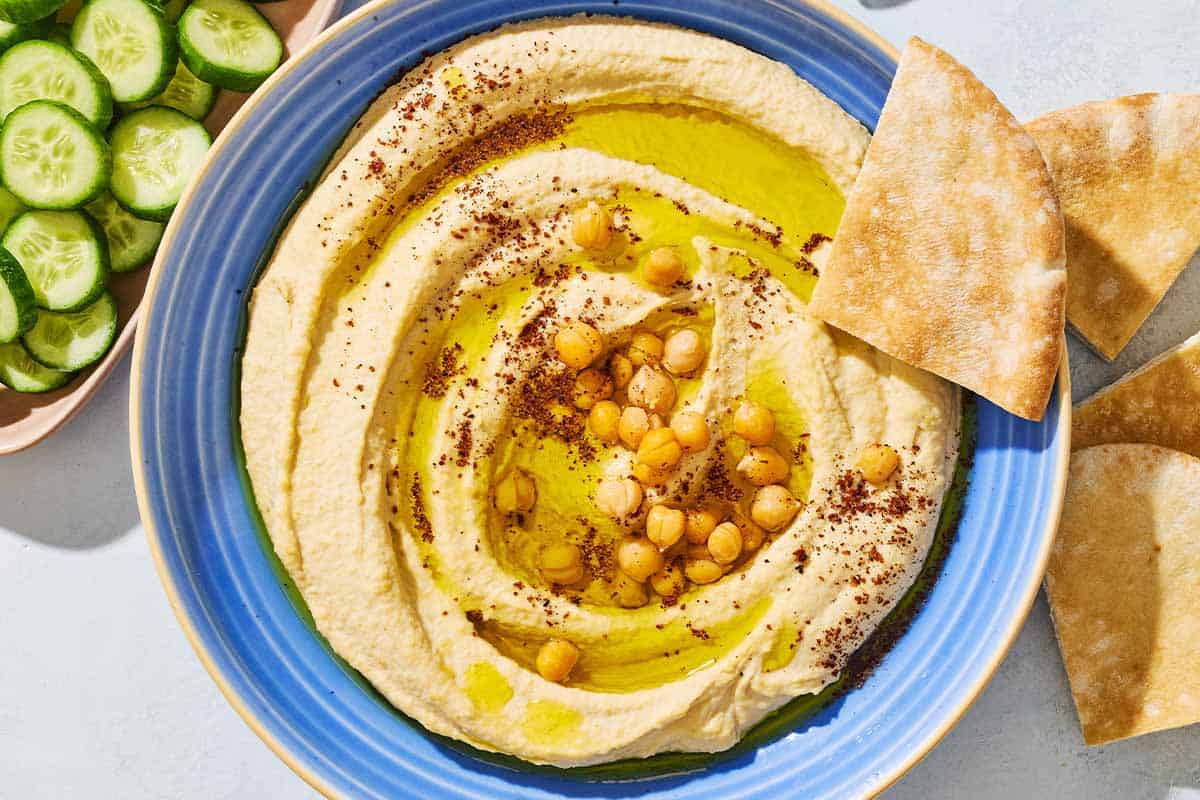
- Classic Dippers: Serve with warm pita bread, pita chips, crunchy raw vegetables (carrots, cucumbers, bell peppers), or flatbreads like laffa.
- Meal Enhancer: Spread it on sandwiches, wraps, or toast. It's a fantastic accompaniment to grilled meats like chicken shawarma or lamb kofta, falafel, or roasted vegetables.
- Garnishes: A final drizzle of extra virgin olive oil is classic. Other popular garnishes include a sprinkle of paprika or sumac, chopped fresh parsley, toasted pine nuts, or a scattering of chickpeas.
- Storage: Store your smooth creamy homemade hummus in an airtight container in the refrigerator for up to 5-7 days. If you notice a slight thickening, simply stir in a teaspoon of cold water to restore its creamy texture before serving.
Crafting truly smooth creamy homemade hummus is a rewarding culinary endeavor that brings unparalleled freshness and flavor to your table. By focusing on quality ingredients, understanding the nuances of chickpea preparation, and mastering the art of blending, you can consistently achieve that dream-like, velvety texture and balanced taste. It’s an easy way to elevate everyday snacks, impress guests, and enjoy a wholesome, delicious dip that rivals the best you've ever tasted. So, gather your ingredients, fire up your food processor, and prepare to delight in the homemade difference. Eager to explore more variations or specific troubleshooting tips? Check out our related guides: smooth creamy homemade hummus - Article 1 and smooth creamy homemade hummus - Article 3.
